How to create a blog post

General tips
Here are some tips for creating Trustwave blogs, Spiderlabs blogs, News Releases and Software updates.
First, let's see some key differences between all of the types of publications.
| Element | Trustwave Blog | Spiderlabs Blog | News Release | Software update |
| Header Image | Uses header image | Doesn't use | Doesn't use | Doesn't use |
| Tag | Uses tag | Doesn't use a tag | Doesn't use a tag | Doesn't use a tag |
| Text images | May have some | Usually has many | Doesn't use | Doesn't use |
And also, some general key tips to create it:
- For titles, always use Heading 3, Font, 24px and bolded text. The colour of the letter should be black.

- For paragraph, always use Paragraph, Font, 16px and grey text.

- In between paragraphs and titles, and after an image on the text, always add one enter-space.
- After an image that has a brief description, e.g: "Figure 1", it's always good to put the description centered under the image, in Italic and with 14px.
- If a word has a link, always check the link works. If the link has a trustwave.com domain, always set the "open on a new tab" box unchecked. If the link has an info.trustwave or any other external link, please check the "open on a new window" box.

1. Navigation and Creating a Blog
1. On the top menu navigate to Marketing >> Website >> and select Blog

2. The list of Blog post will open https://app.hubspot.com/website/21158977/blog/posts/all

3. To the right top screen click on the orange Create button

4. A Create blog post pop-up will open

5. Open the Select a blog dropdown list and select either SpiderLabs Blog, Trustwave Blog News Release or Software update. Once your selection is made click the Create blog post button

6. An empty blog is created

2. Blog Settings
1. Before all the good stuff we need to first do all the settings. On the top right-hand side just under the menu you click on the Settings button

Post Name and URL
- Enter the name of your post in the Blog title
- Leave the Blog drop-down as is
- When you enter the Blog title the URL is automatically created in the content slug.
- Last step is to go to the end of the content slug text box and put a forward / in to complete the URL

Last Step

Scroll down to the Author and Tags
- Search for the Author's name and select an Author. If there is no Author, select Blank as this is a required field.

- If the Author does not exist Click on the +Create a new author link at the bottom of the dropdown list. A pop-up will appear, Enter the Autor Public Name and Last name and click the Create author button at the bottom. This is sufficient to create an author.

Tags if required can be selected from the existing lists of tags.
Do not create new tags. Refer new Tag requirements to the Web Team.
NOTE: only Trustwave Blogs do use tags. If so, choose a tag related to the blog itself.

Scroll down to Feature image.
NOTE: Trustwave Blogs have a Featured image whereas SpiderLab Blogs, News Releases and Software Updates do not.
Lets start with those that do not have a Featured image. Click on the ON toggle to turn this off.

Adding a Feature image

Firstly ensure that the image has been compressed on TinyPNG format using the compression tool.
Click on the Browse images link not the Upload to bring the image into HubSpot. The reason will become clear shortly.
The Insert image pop-up will open. Now click on the Browse folders link as illustrated below

The folders list will open. Select the Blogs folder. Then the appropriate sub folder .

Once you are in the correct folder, click the Upload images button. This will save the image to the correct folder. But we are not there yet.

A dialog box will open from which you can select the required image from you PC.

When the image has uploaded you can now select the image (normally first on the list) and you are all done.

The warning that appears "Your image may not work on social media post" is not a problem as we do not use that feature of the blogs.

Scroll down to Metadata. Add a short but punchy description of the blog or the first paragraph of your blog. Edit this description until it is within the recommended characters. If you're not sure on what to put, you can always use the first sentence of the blog, and resume it if the characters were too extensive according to the recommended amount.

Once all the above has been completed close the settings pop-up, it will autosave.
![]()
You are now ready to get started writing away. Notice that the Blog Title and Feature image are now filled in.

3. Enter your blog content
Scroll down past the Featured Image and click to add text link.

4. Text
You can copy and paste your content from a document or enter your content directly on to the blog surface.
A full rich text menu is available above. Just a few notes.

All H headers text colour should be changed to the dark grey as illustrated below.

To make sure all the text copies correctly and without any format, you can use this tool: https://word2cleanhtml.com/ - to so, you need to copy all the document, paste it on the field, click on "Convert to clean html", and third, copy the text on the third tab (see second picture).


4. Text Links

There are 2 ways to insert a text link.
The 1st is to highlight the text in your article you would like to have a link on , then click on the text link icon in the rich text menu above

Select an option from the link to dropdown menu (See option list expanded below)

Anchor on this page : auto scroll to a position with in this article
Email address : never used in blogs
File : A PDF , Text or image within HubSpot's Files (Marketing >> Files and Templates >> Files) (Always tick the checkbox "Open this link in a new window" )
Meeting : never used in blogs
One of your pages : a select option will open and you can find a Web Page, Resource, Landing page or Blog post published on trustwave.com or info.trustwave.com
URL : an outside website / page or an unpublished Web Page, Resource, Landing page or Blog post on trustwave.com or info.trustwave.com. (tick the checkbox "Open this link in a new window" if it is a non Trustwave page )
Click the Insert button
The 2nd method is to click on the text link icon in the rich text menu above. The Insert Link dialog will open. The only difference on this method, from the 1st, is you enter your Link Text in this option.

5. Images

In the Rich Text menu above select the image icon and follow the steps described above under Featured Image to upload new images into the Blog Folder.
Images can be sized , aligned etc by clicking on the image, where a image menu will appear.

Image Links
Images can have links or have the full size image file link (most commonly used for Spiderlab images) by adding a link to a URL or the HubSpot File. To do this click on the image and a small dialog will appear. Click on the pencil icon to open the dialog. Select from any of the Image option and follow the requirement for each option.


Image placement

The left setting will place the image left aligned in its own block. Text will be above and below the image.
The second setting will allow text next to the image depending on the width of the image. The image will be left aligned.
The third setting will centre the image on the page. Text will be above and below the image.
The last setting will allow text next to the image depending on the width of the image. The image will be right aligned.
Image Spacing
To allow padding to the right, left, top or bottom of an image you can click on the spacing and enter a value of the desired pixels you want to have around the image this will move the text away from the image edge.

Image Alignment

To align an image to indented text use the < or > setting in the image menu
The first icon will allow you to set the gap between the preceeding text and the image.
6. Tables
Tables can be copied and pasted from a document or workbook. Alternatively you can create a table by clicking on the Inset dropdown in the Rich Text Menu and following the instructions.

Responsive Tables Settings
To ensure that your table is responsive click on the table , a Table dialog will appear on the top right of the table
 Click on the little table, the whole table is selected.
Change the settings to
Table Width = Percentage
Responsive toggle to on

Table Styling
The Table specific styling is found by selecting a cell in the table and the option can be found in the Rich Text menu to the right


7. Saving , Editing and Publishing Blogs
Blogs are automatically saved as you work, you can exit a blog and come back later to complete the blog as it will stay as a draft till you publish the blog.
To get back to your blog navigate to the blog list as described above and search for your blog by name. Click on the Edit button next to the blog and you are off.
Publishing and scheduling for publish
 Only the Web Team can publish blogs.
When you have completed your post, you can now request approval as follows.
Allow for enough time for the approval process to be completed.
On the right hand side the is a list of icons select the bottom icon to request approval.
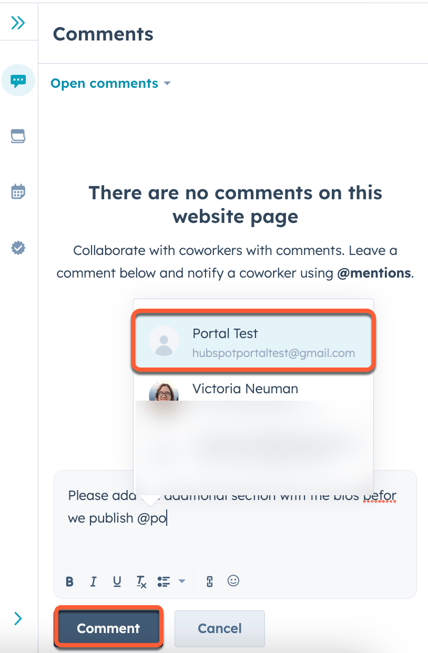
In the comments as described below put your desired Publish Date and Time.
Included below is the HubSpot knowledge based article on approvals .
Request approval on a post or page
You can request review of a blog post, landing page, or website page from within the content editor:
-
Navigate to your content:
- Website Pages: In your HubSpot account, navigate to Marketing > Website > Website Pages.
- Landing Pages: In your HubSpot account, navigate to Marketing > Landing Pages.
- Blog: In your HubSpot account, navigate to Marketing > Website > Blog.
- Hover over a post or page and click Edit.
- In the content editor, click the Request approval dropdown menu in the top right and select Request approval.
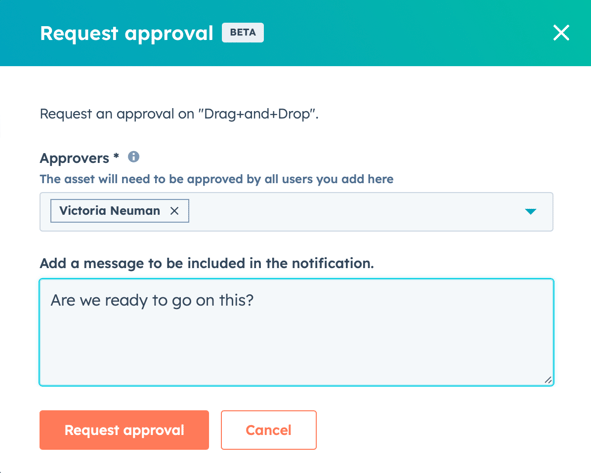
- In the dialog box, click the Approvers dropdown menu and select the checkbox next to each user you are requesting approval from. You can also include a message that will be sent with the approval request.
- Click Request approval.
- To check on the approval status of your content, click the Approvals dropdown menu in the top right and select View approval activity.
- One of the following approval statuses will appear in the sidebar:
- Pending approval: the content is waiting on approval. Other users, including super admins, will not be able to publish the content.
- Approved: the content has been approved and can be published.
- Approval recalled: the approval has been recalled by the user who initially requested it.
Approve or reject content
You can approve or reject content in the content editor. Approved content can be published by any user with the correct permissions. Rejected content must be resubmitted for approval before it can be published.
-
Navigate to your content:
- Website Pages: In your HubSpot account, navigate to Marketing > Website > Website Pages.
- Landing Pages: In your HubSpot account, navigate to Marketing > Landing Pages.
- Blog: In your HubSpot account, navigate to Marketing > Website > Blog.
- Hover over a post or page and click Edit.
- To approve content for publishing:
- Click the Approvals dropdown menu in the top right of the content editor and select Approve.
- In the dialog box, enter an approval message that will display in the approval notification, then click Approve.
- To request changes to content before publishing:
- Click the Approvals dropdown menu in the top right of the content editor and select Request changes.
- In the collaboration sidebar, enter a comment with your requested changes, then click Comment. To tag the user who requested approval in your comment, type @, then the name of the user. In the dropdown menu that appears, click the user.
Recall an approval
If you need to restart the approval process, you can recall an approval. Once you've made your changes, you can request approval again.
To recall an approval:
-
Navigate to your content:
- Website Pages: In your HubSpot account, navigate to Marketing > Website > Website Pages.
- Landing Pages: In your HubSpot account, navigate to Marketing > Landing Pages.
- Blog: In your HubSpot account, navigate to Marketing > Website > Blog.
- Hover over a page or post, then click Edit.
- In the top right, click the Approvals dropdown menu and select Recall approval.
- In the dialog box, enter a message that will appear in a notification to all original approvers.
- Click Recall approval.

Latest Internal Blogs
Clockwork Blue: Automating Security Defenses with SOAR and AI
It’s impractical to operate security operations alone, using manual human processes. Finding opportunities to automate SecOps is an underlying foundation of Zero Trust and an essential architecture...
Read MoreTrustwave SpiderLabs Report: LockBit 3.0 Ransomware Vs. the Manufacturing Sector
As the manufacturing sector continues its digital transformation, Operational Technology (OT), Industrial Control Systems (ICS), and Supervisory Control and Data Acquisition (SCADA) are becoming...
Read More10 Dynamic Principles for Crafting a Robust Database Security Strategy
In this era, threat actors have proven to be tireless in their pursuit of exploiting vulnerabilities and gaining unauthorized access to online platforms using anything from simple to sophisticated...
Read More